![]()
ACME ADAPTERS EXTREME HI-STEER
2"BODYLIFTKIT
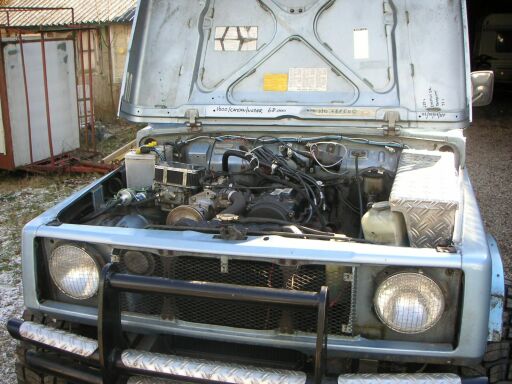
The main reason for putting on a Bodylift was because with the Weber on the SuperCharger, the hood couldn't close anymore. I bought a 1" Bodyliftkit from Calmini on Ebay England, but when it arrived it consisted of 4 1" high Aluminum pucks and some nuts, rings and bolts ? The seller had not taken out anything, package was undamaged and in the instructions it said that you had to put the 4 pucks on the 4 corners of the vehicle.......what about the rest of the supports? Just leave them floating in the air ?? I decided to make my own BodyliftKit in 2", why not go up 1" when the idea has already been conceived ;-)
Of course there are loads of companies, offering loads of different types of BodyLiftKits for the Samurai, but what more fun can it be to try and find out what works and what not. I looked at most articles on the Internet about bodyliftkits and picked up the things I liked about them, making a list of things to keep in mind. Of course I talked to the guys @ OffRoadCentre in Utrecht and Suzi's Place in Buren and had a look under some Samurai's to see what went where and how it was positioned.
I did not want to cut large holes in my floor to reach the top of the bolts l, so I could grind their heads off and hammer the rest out with a screwdriver, ike I read somewhere, as you do have to patch up all those holes again !
Having been a Chevy driver for the last 7 years I do still think large and heavy but better to be safe than sorry ;-)
First some advice I read in other articles and because they are very valuable:
- Do not start this job on a Saturdayafternoon, start on a Fridaymorning, so there's plenty of time to go get the parts that you forgot or need to change/buy because you broke them
- Have an extra vehicle ready to take you to the hardware store time and time again ( which hopefully is nearby, mine was just 1 kilometer away ).
- Have some-one with you in the garage ! Doesn't have to be some-one with insight in Samurai's, just some-one who knows how to operate a Hydraulic Jack and knows the difference between a screwdriver and a 13 mm socket, so you don't have to get from under the car a million times.
-Be sure the car's wheels are secured with pieces of wood or stones. I lifted the body and heard a loud "clunck"and the car moved. Appeared the body had pushed the gearlever out of 1st gear !!!
- And one I never read anywhere before but experienced myself: 1 or 2 days before you start this job, get a jetwash and hose the underside of your car ! You'll be chewing sand for days after if you don't and will be working on a very sandy floor during the job !
I
took some 5x5 centimeter ( 2 x 2" ) square pipe with 3 mm wallthickness and cut
6 pieces of 10 centimeter and 10 pieces of 5
centimeter. I drilled 4 of the 5 centimeter pieces with a 12 mm drill
( all the way through ) and put a 8 cm Stainless Steel M10x1.25 bolt
through it for all four corners ( that's
1.25, so not Metric like I
bought at first, which are in the picture below ), the original
M10x1.25 nuts are welded to the bodysupport and can be
used again this way .
Then I
drilled a 12 mm hole through the 6 longer pieces ( of 10 centimeter ) and enlarged one of these holes to 24 mm, so I could fit
the slimmest socket through it ( MannesMan has a very slim 17 mm socket for
the 10 mm bolthead ).
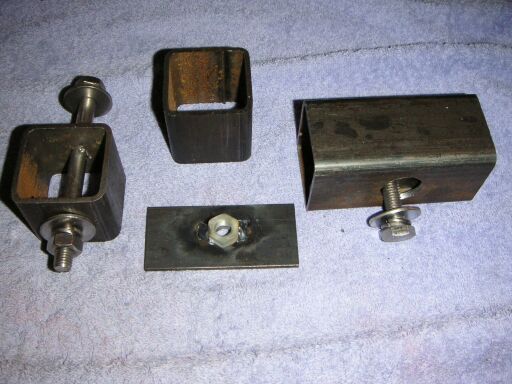
I then shortened 2 of these long pieces by 2
centimeter on one side, so I could fit them on the support near the
rockerpanel. The other 6 pieces of 5 cm length I left just
like that, they are just to carry the body where it rests on the
chassis, I've glued them between chassis and body with windowkit.
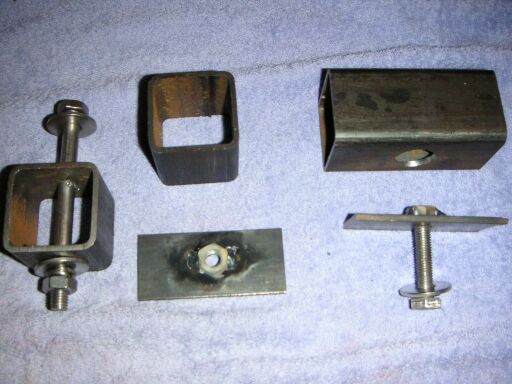
I also cut 6 pieces of flat metal, 4 centimeter wide ( so it fits nicely in the 5 cm square pipe ) 8 centimeter long and drilled a 10mm hole in it. On one side of that hole I welded a M10 nut.
I loosened all the original bolts and nuts from the body, 2 behind the grill, 2 behind the seats on the outside, 2 behind the seats near the handbrake, 2 in the rearbumper, and if you have an LWB like me: 2 more in the bed near the innerrearfenders ( check your Haynes manual to find them ):
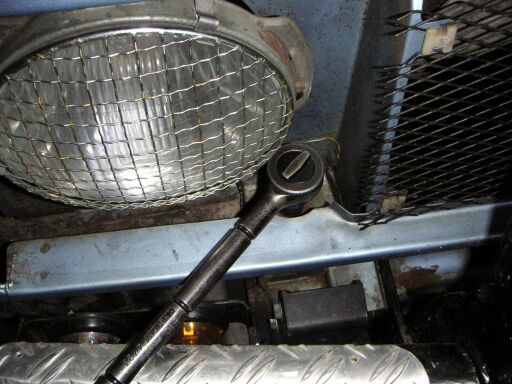
Cut the plastic pins that are in the steeringcolumn ( barely visible in this picture, but they are the little white dots ), so the column could slide a little. In one article I read they adviced to heat the steeringcolumn to melt the factory Loctite, I didn't and it slid anyway, probably Mondaymorning Loctite on mine . Leave it like that and certainly do NOT put a screw back in to secure the column again, unless you want the steeringcolumn in your chest in case of a collision, the pins are meant to break and let the column slide in such an emergency !
I loosened the clamp for the brakelines on the inside of the righthand fender, the fuelfillerhose and breatherhose in the back, raised the body one side at the time with a large jack and some large pieces of wood against the bottom of the body and a small jack between chassis and body for the extra support. I noticed the rearbodywork getting caught in the rearbumper so I took that off as well. Check your fuel-, water- and brakelines while lifting the body.
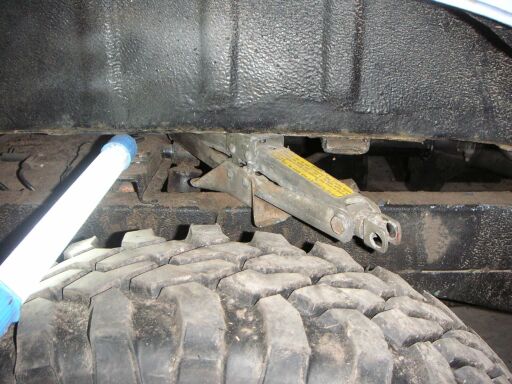
I cut M10 Metric thread on the higher part of the bolt that has no thread and cut the bolts just above where the original thread was ( they only have thread on the lower part, up to about 3 cm from the top ). Slid one of the 10cm blocks over it, put a chassisring, a lockring and an M10 nut on the thread and tightened it with the MannesMan socket through the 24 mm hole on the underside of the block. It fits through the hole in the bodysupport as you can see.
Then I put the 8 cm flat piece of metal in the 5x5 ( on the bottom ) and bolted a 8 cm long Stainless M10 bolt - again with chassis- and lockring - through the original chassispoints with the original rubbers that go between chassis and body. Good thing is, that even if you don't lift the body that high, you can slip the socket through the hole in the bodysupport.
Here's one of the blocks installed:
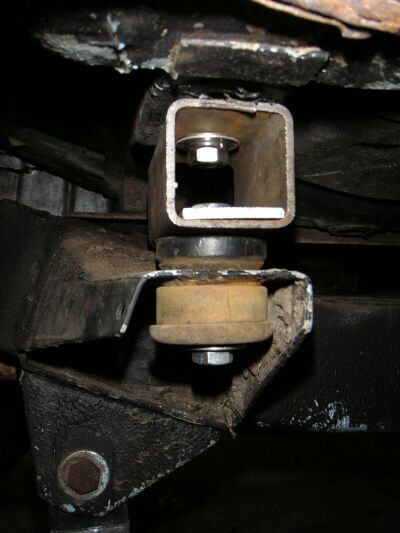
Top is the original bolt cut to the length I needed, cut with M10 thread all the way to the bottom of the car, with Stainless M10 nut and rings, bottom is new Stainless M10 bolt and nut. Original rubbers were good so I used them again, you might consider buying new ones if yours are worn.
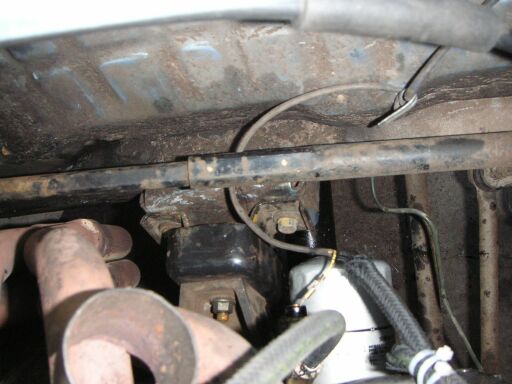
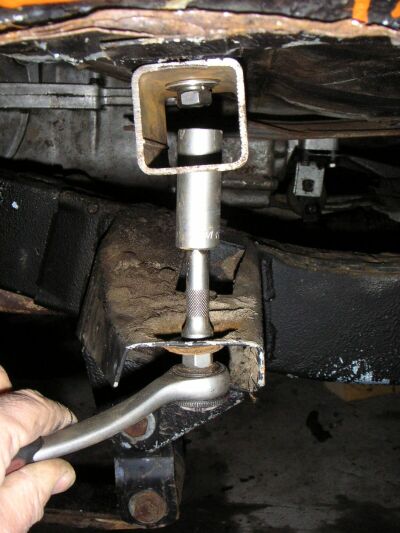
I took some pictures of the way I did it on the inner support under the drivers seat.
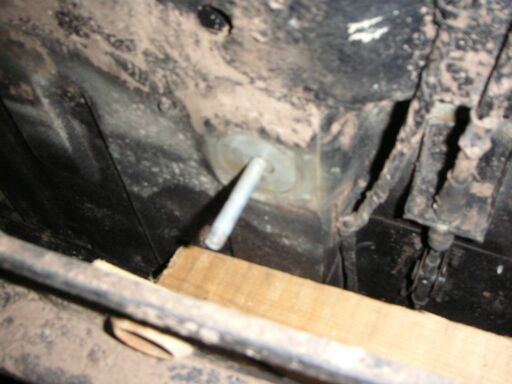
This is what it looks like when you lift the car and take the bottom rubber off, the rubber with metal tube slide off after some prying:
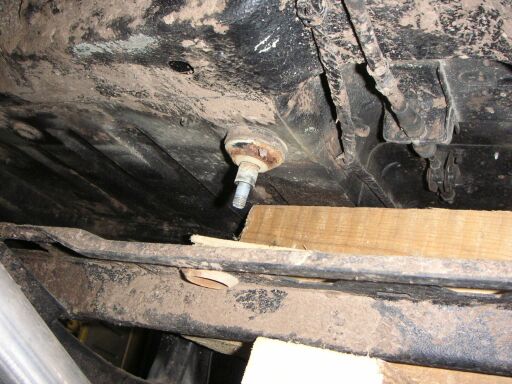
What's left is the long "pin" with thread only on the lower part
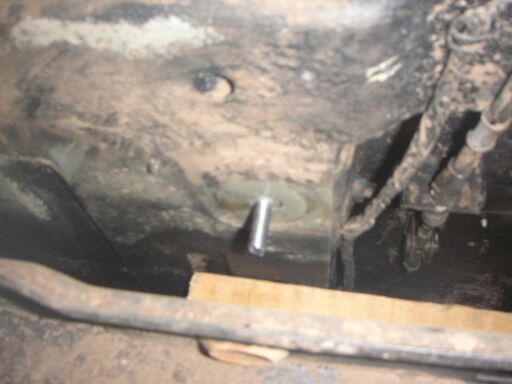
I cut it of ( couldn't reach with the grinder so used a saw ) just above the thread and cut M10 Metric on the pin that was left ( bad pic, but I'm a wrenchman, not a photografer ;-) )
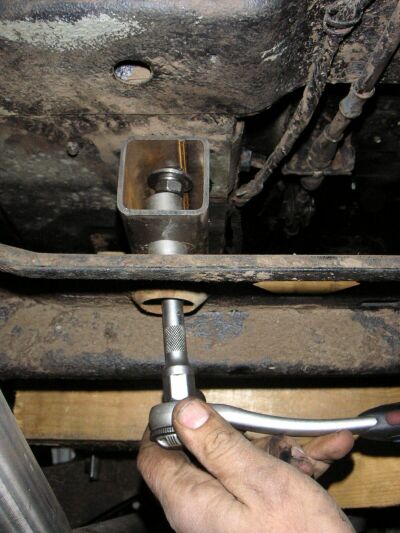
Slid the 10 centimeter block over the threated pin, put a Stainless chassisring, lockring and nut on it and tightened it through the bodysupport and 24 mm hole:
After that I put the original rubbers back on and tightened it like I did in the pictures above this section.
For the 2 sideblocks, next to the rockerpanels ( outside next to the chairs ) I had to make some changes to my design, because I couldn't get the handle that holds the cuttingplate to turn around because of the rockerpanel.
I forgot to take pics but will try to explain:
I took the grinder and - over "the long side" cut a piece of metal out from the side to the 12 mm hole, so I could slide the block over the pin, I couldn't cut thread on the pin, so I cut the pin on the threated part with just enough thread for the originel 10x1.25 nut, put some rings and a big M14 nut over it as spacer and tightened it that way. Because this is just a little longer that the pins I cut above the original thread I had to grind of some of the height of the nut that I welded to the flat piece of metal to tighten the bottom part, there was just that little space left.
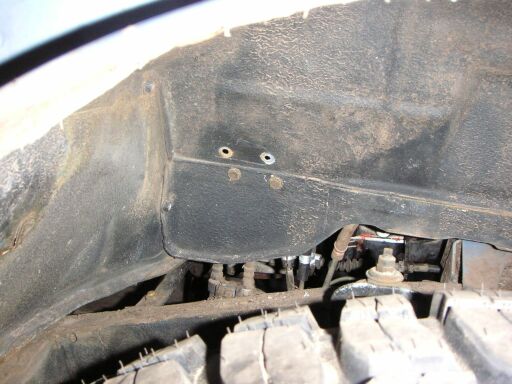
Do not forget to re-attach the fuelfiller- and breatherhose and drill new holes for the brakelineclamp
Was it worth it ?
Because of the different design and the fact that I had to do it all on my own, getting from under the car a million times to adjust the jack, get that screwdriver that's rolled just out of reach, dropping a nut somewhere you can't find it anymore and go to the hardware store 3 times for different bolts in the freezing cold it took me a total of about 8 hours ( one hour just to find that the LWB does have 2 extra bolts contary to what they told me when I informed on this and the previous owner had covered them with new sheetmetal during a rustrepair ).
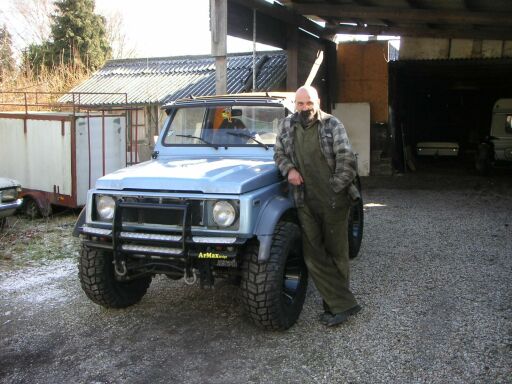
Yes, it's worth it, the hood closes because of the engine now being 5 cm lower:
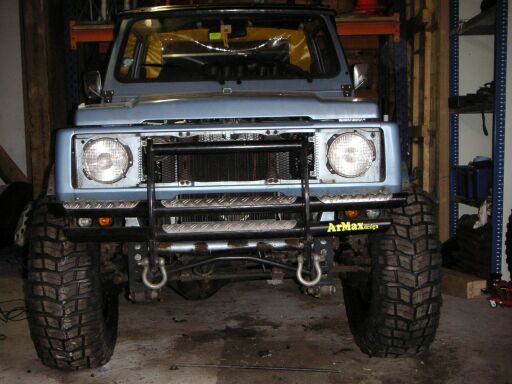
Luckily the recently made bumper/pushbar now lines up with the bottom part of the grill, so I do not have to change that.
And I had some more room for the big tires:
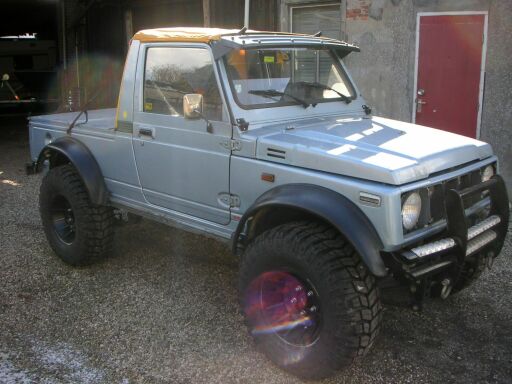
Rolled it into the sunshine ( but freezing cold ) and took some more pics, also testfitting the wider fenderflares:
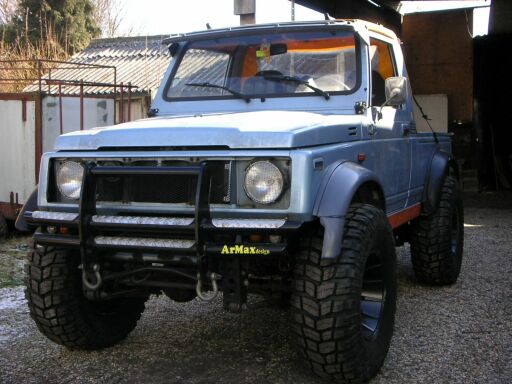
Hood is 120 centimeters measured over the centre of the frontwheel:
Shoppinglist:
5x5 centimeter square tube:
- 4 pieces of 10 centimeter with 12mm and 24 mm hole opposite each other
- 2 pieces of 8 centimeter with 12mm and 24 mm hole opposite each other
-10 pieces of 5 centimeter, no holes
Flat metal:
6 pieces of 4 centimeter wide with 10mm hole and M10 nut welded on
Bolts and Nuts:
-6 M10 x 1.25 bolts, 8 centimeters long
-6 M10 bolts, 8 centimeters long
- enough chassis- and lock rings for those bolts and to use as spacers
Tools:
- Grinder
- Metalsaw
- M10 cuttingtool
- Slimmest 17 socket you can find ( MannesMan )
- Hydraulic Jack
- Small standard Jack
- Blocks of wood
- Normal wrenches, screwdrivers and sockets you use
Always good to have:
- Coffee
- Cigars
- Some-one to help you
- Sunshine
If you have any questions remainng, feel free to mail me on: max@nitromax.nl